Since my book prerelease launch, I’ve received a similar request several times - is there a sample? Can I preview it? What’s it like?
All fair questions, so today I thought I’d include a sample chapter right here in a blog post. So without further ado, here’s one chapter from the Accessibility section, “The Rotor Control”, which gives you an idea of what the book is like:
The Rotor Control
The rotor control helps make navigation quicker. That’s what it does at its very core. Consider the user interface below:
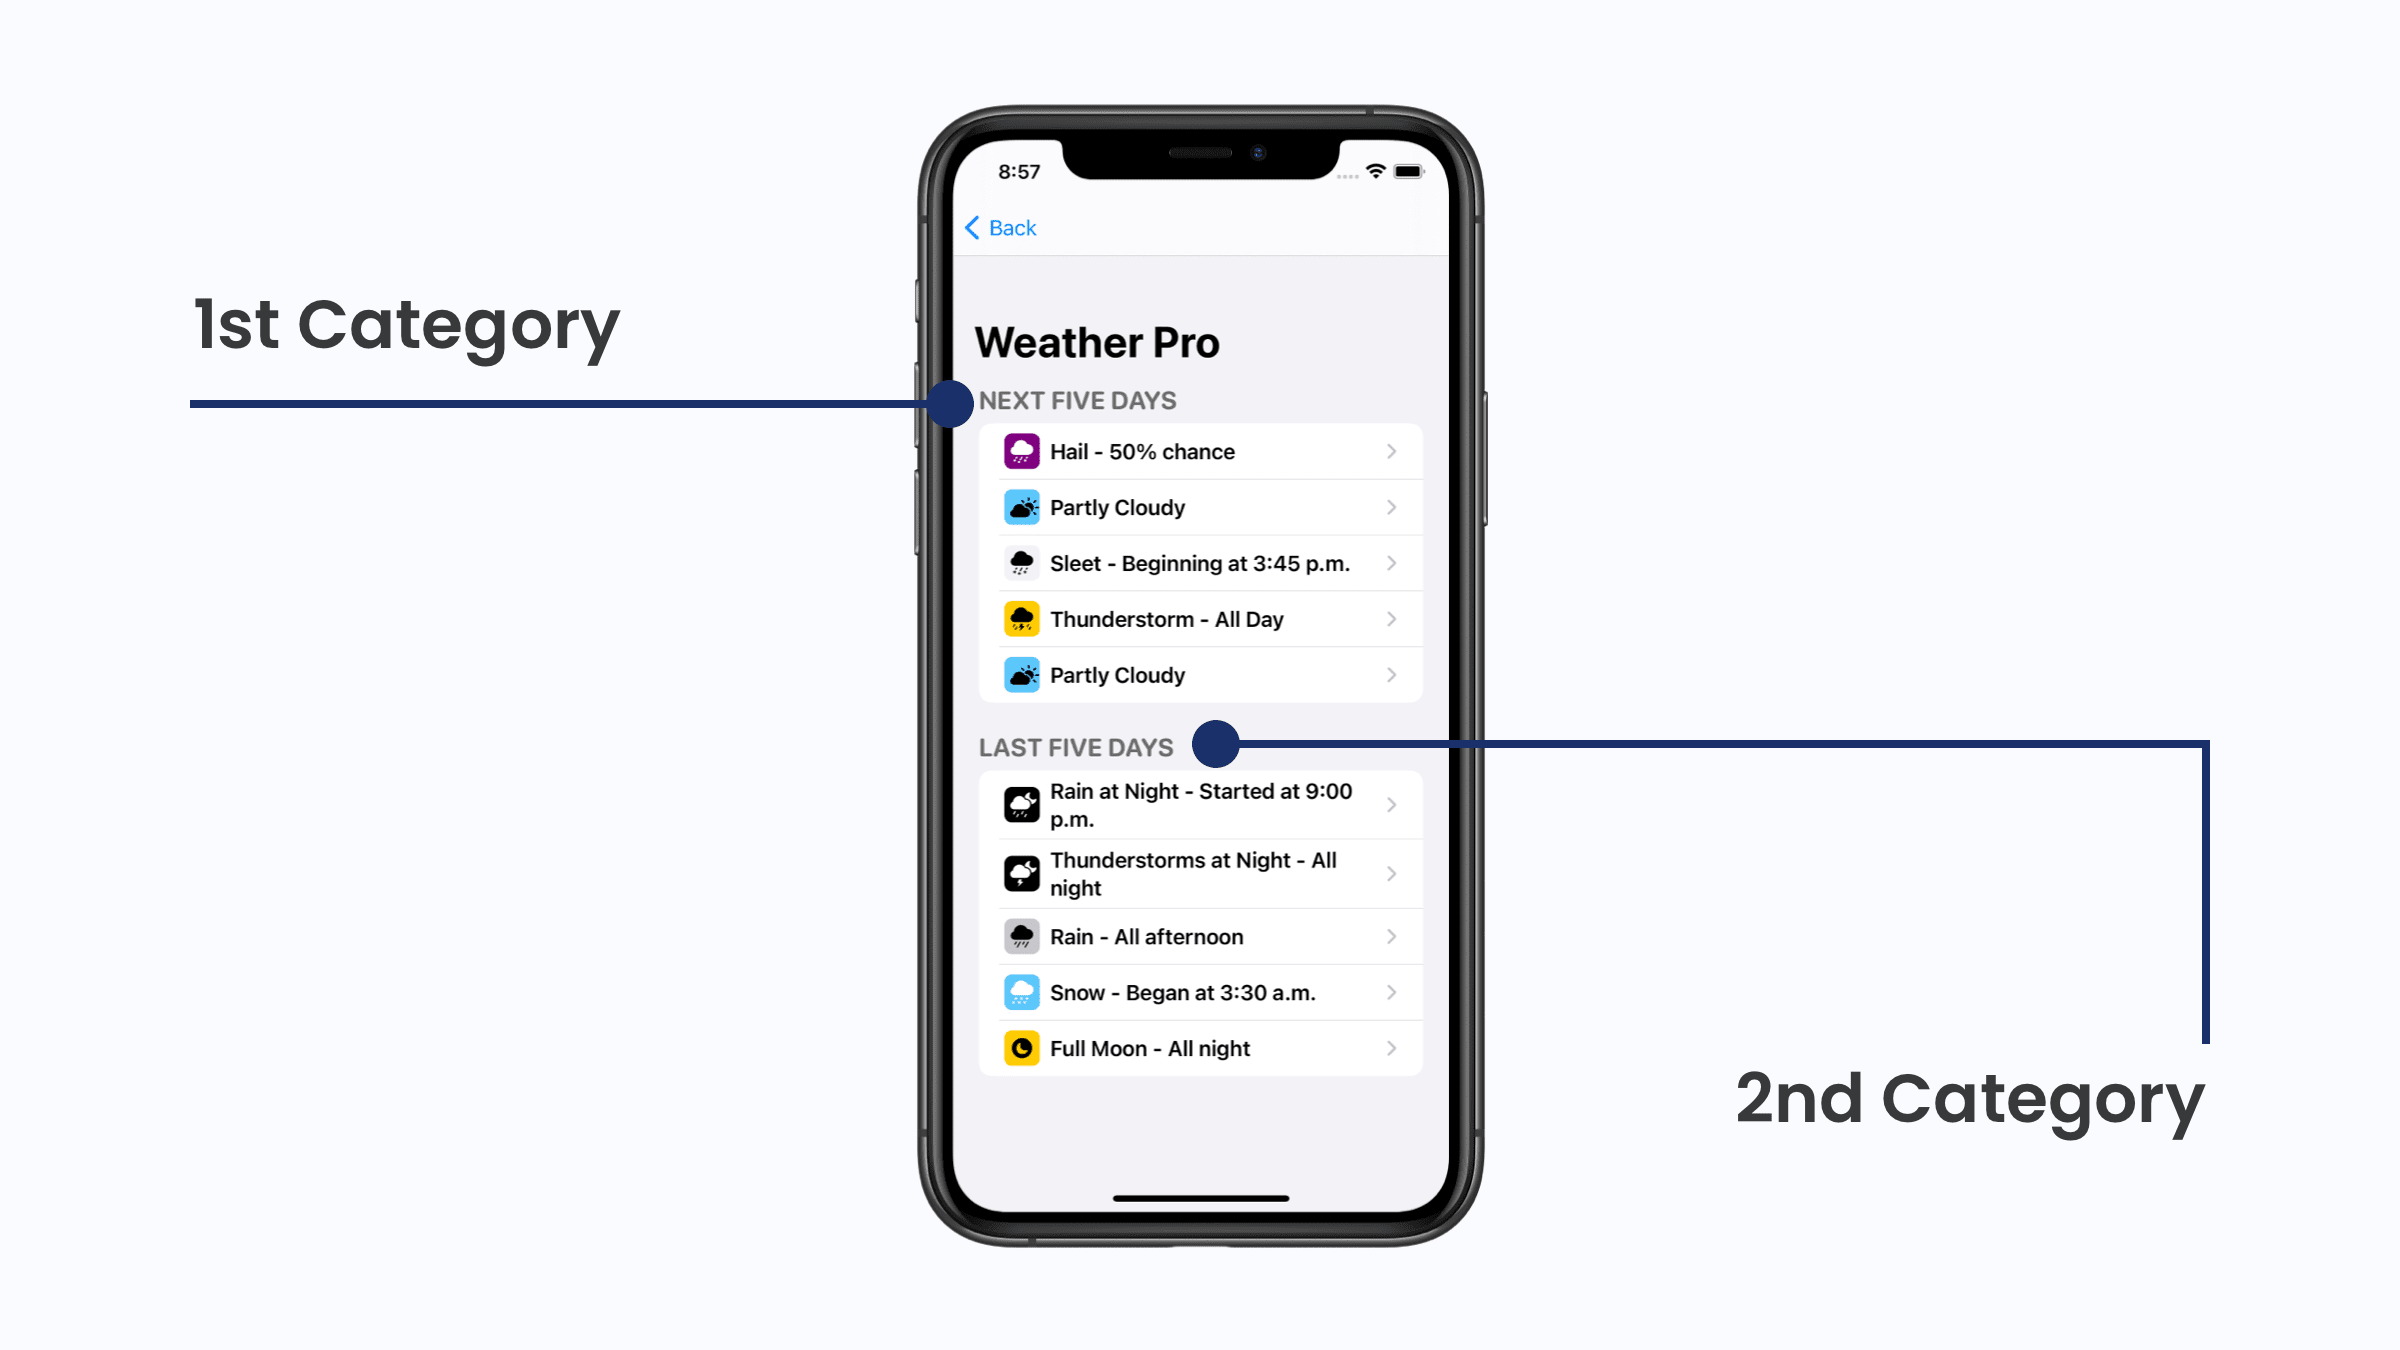
Visually, we get the benefit of context fairly quickly. We can pick out a few main headings, reason about content sections and generally get a feel for how we want to navigate the view. For example, we may not be interested in the top “Next Five Days” section since we intended to revisit the “Last Five Days” section right away. We can do that because we can see it. And when we can see it, we reason about where we want to go. In this case, we’ve seen that there are two main categories here, and based off of that - we chose to “navigate” to the second one.
The Rotor Control can give VoiceOver users that same affordance. One of its many benefits is that it can tell VoiceOver to only navigate by, or to, certain elements (such as headers). In our example above, that would allow VoiceOver users to navigate with the same efficiency as users who aren’t visually impaired might.
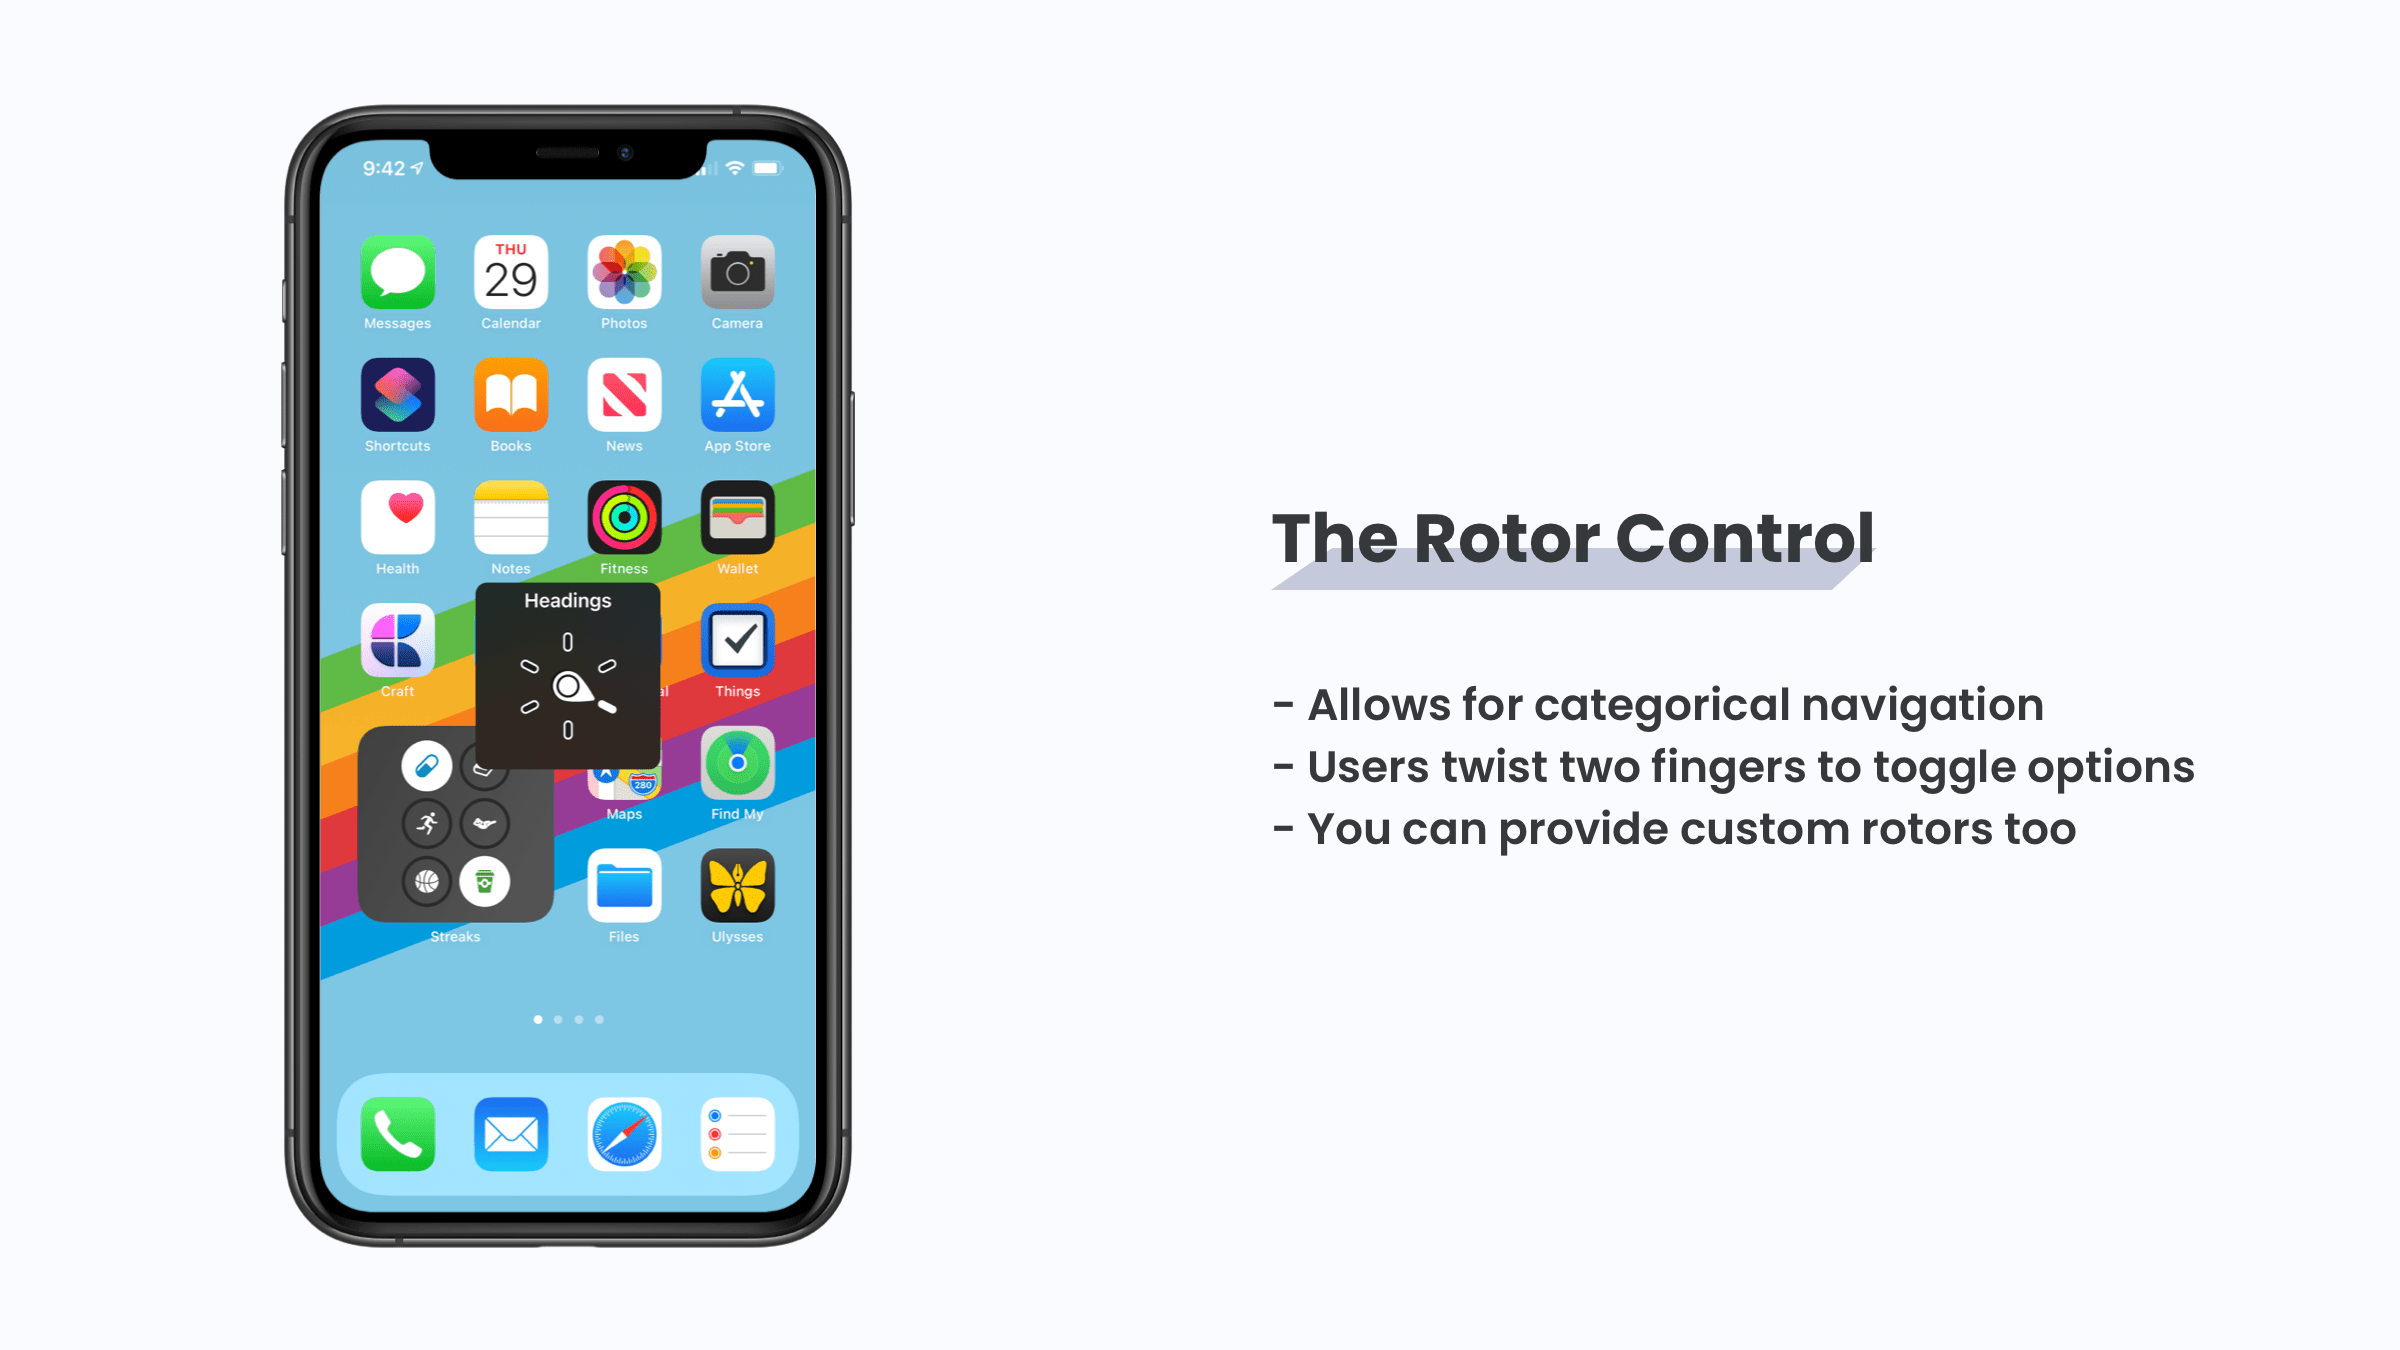
The Rotor Control has several ways to help with navigation. In fact, its capabilities shift with the context. There are options to change the speaking rate of VoiceOver, move to only misspelled words in text, change input methods and more.
So, how do developers fit into the Rotor Control? Primarily, two ways.
First, we can create our own rotors to hand off to the system’s Rotor Control to make custom categorical navigation possible for VoiceOver users. This is what we focus on in this chapter. If you find yourself in a situation where you’ve got an interface that would make sense to navigate to categorically, and the system’s default rotors don’t cover it - then you’ve found a great opportunity to supply your own custom rotor to fill that gap.
Secondly, we can make sure we’re using the correct accessibilityTraits in our apps to make sure the system provided rotor controls behave as users expect. If we’ve built a custom header-like element but we haven’t indicated to the system that it is a header-like element, then we’re essentially taking away functionality from VoiceOver users.
How it Works
Any NSObject has a custom rotors property we can assign to:
open var accessibilityCustomRotors:[UIAccessibilityCustomRotor]?
When we assign to it, those rotors become available to VoiceOver. Each rotor needs to know a few things:
- The name or type of the rotor
- The next element that it should navigate to
To vend that information, you’ll be dealing with three classes and one type aliased closure:
UIAccessibilityCustomRotorUIAccessibilityCustomRotorItemResultUIAccessibilityCustomRotorSearchPredicatepublic typealias Search = (UIAccessibilityCustomRotorSearchPredicate) -> UIAccessibilityCustomRotorItemResult?
The rotor houses all of the information. The result is returned by us to let the active rotor know which element to go to next. The search predicate exposes what element is focused and which direction the user is navigating (in Rotor Control terms, either up (.previous) or down (.next). Finally, the search closure gives you the last active predicate while returning the next rotor item.
Let’s look at an end-to-end example. Consider a row that has four square views in it, and that a view controller is showing three of these rows. Each row has a different color, and each square within the row has a .button accessibility trait and the user can swipe through each one.
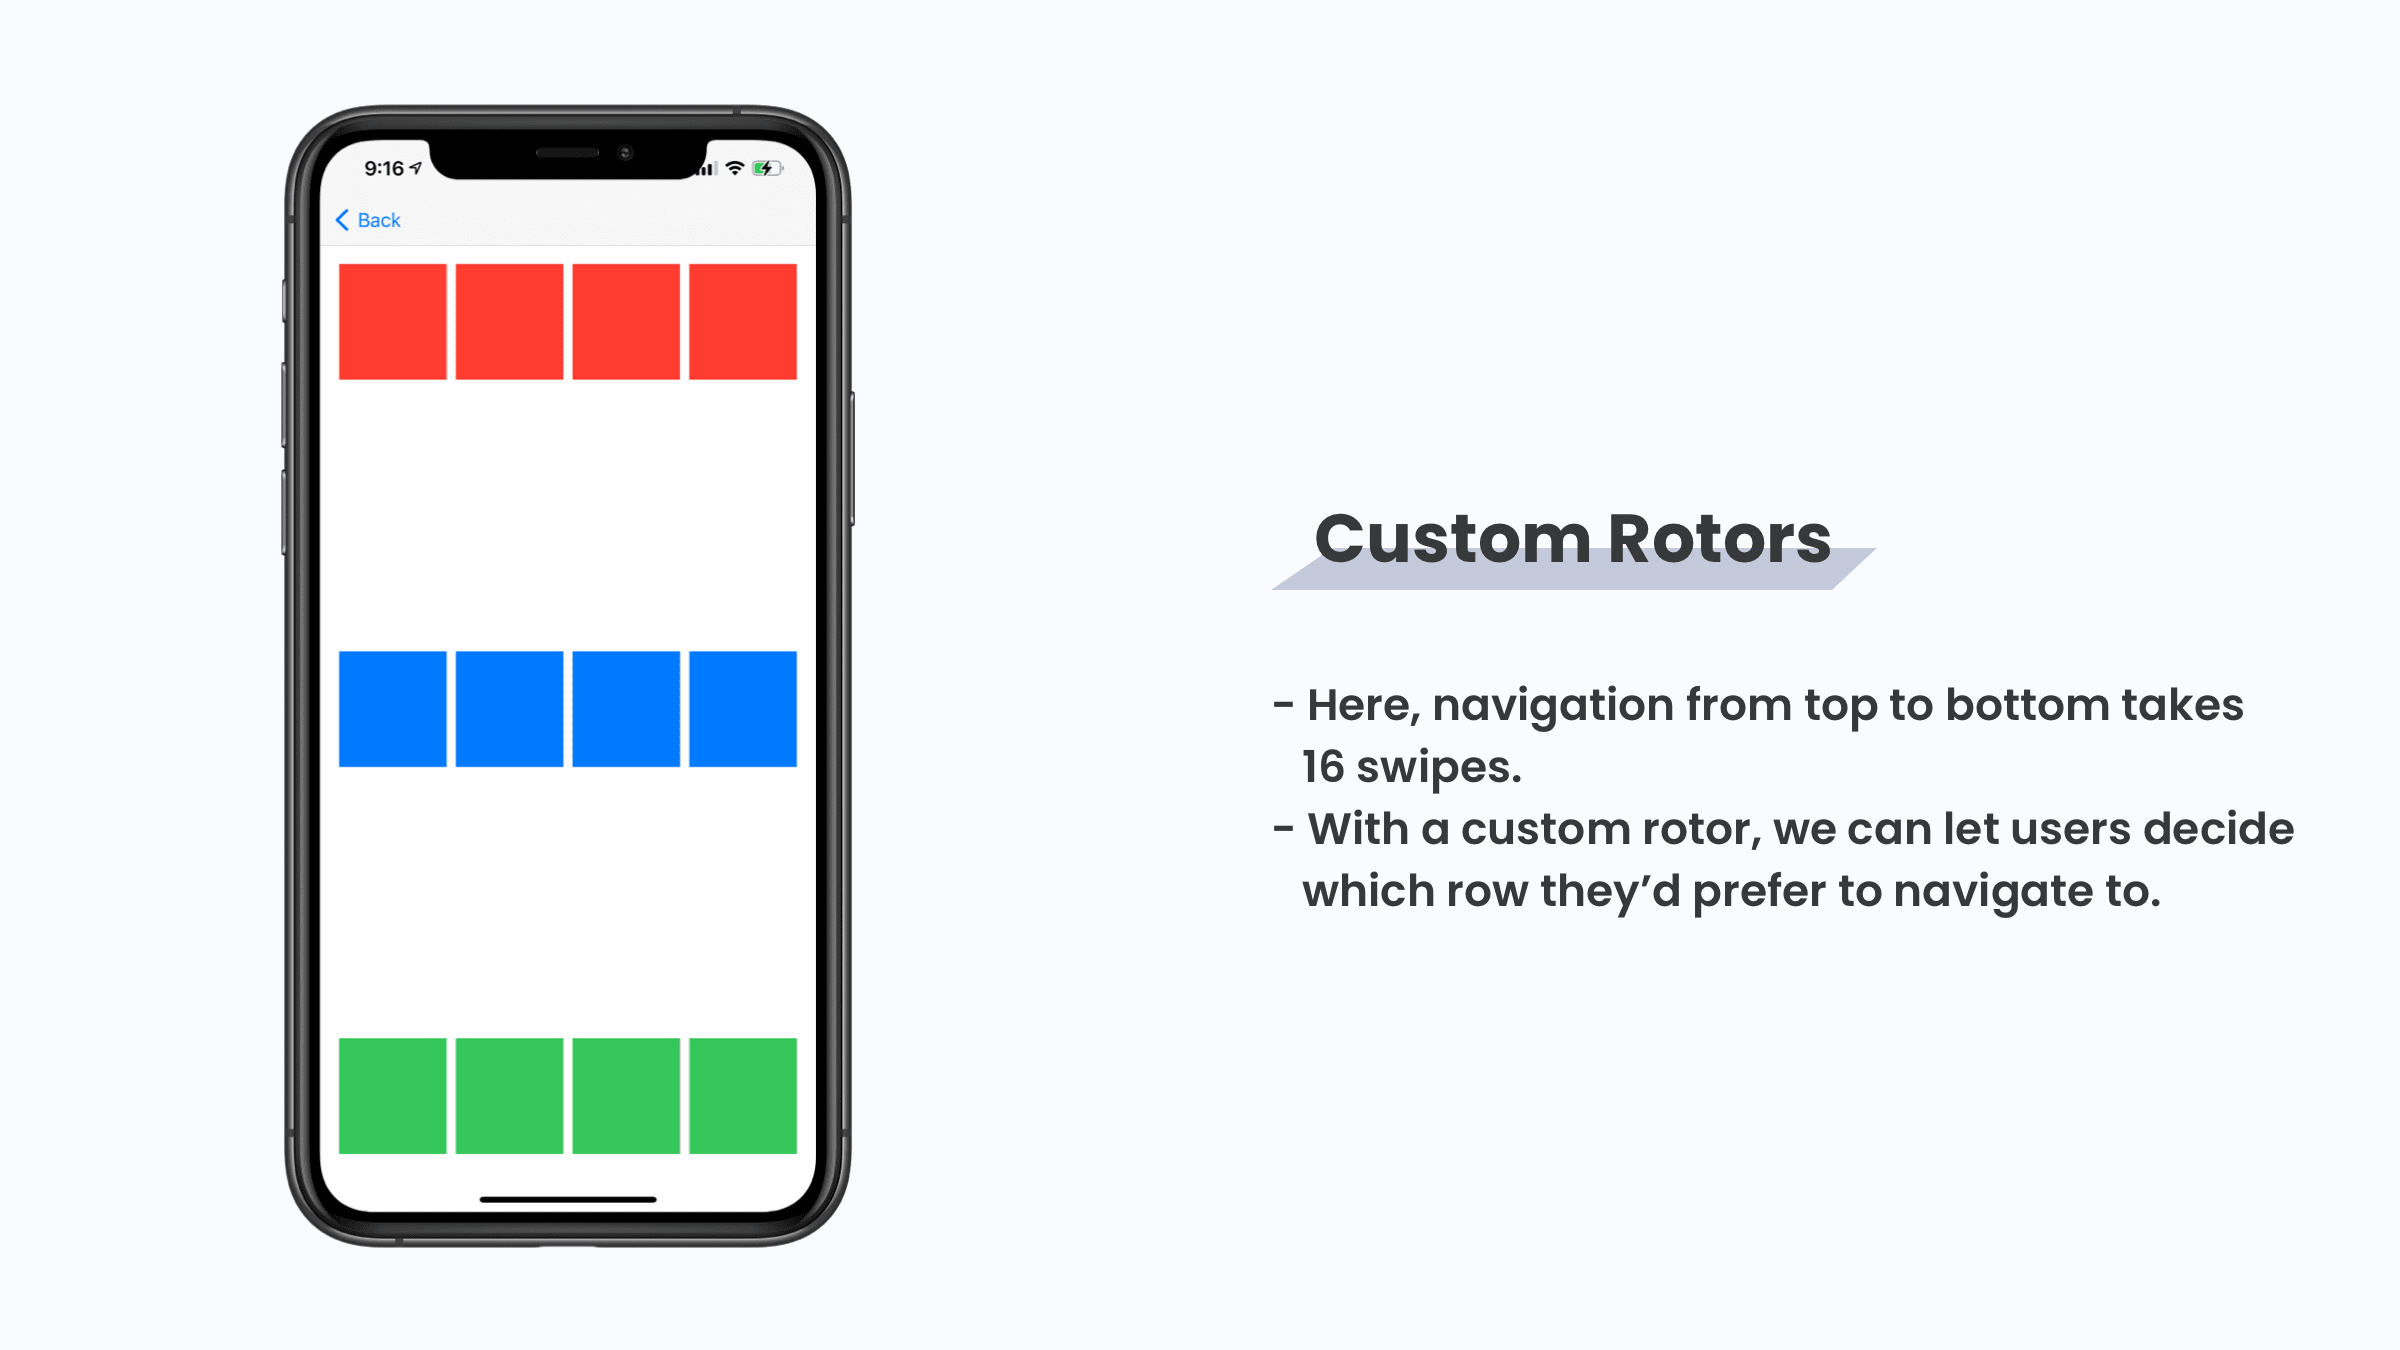
Without doing anything, if they want to see the colors in the last row, they’d have to swipe towards it several times to get there.
With a custom rotor, we could simplify things two ways:
- Provide a custom rotor that toggles each active row in of themselves (i.e. flick up and down to switch rows) or
- Provide three custom rotors, one for each color, where flicking up and down navigates to each square in the row.
Remember, when a rotor is active - the primary navigation gesture is swiping up or down to select items within that rotor’s category. Users can, and commonly do, still swipe left and right to navigate through the view’s hierarchy still. A rotor is used in tandem with typical VoiceOver navigation.
Sticking with example two from above, here’s what an implementation might look like:
// Xcode -> RotorControlFig1ViewController.swift
private func colorRowRotor(forColor color:String, stack:UIStackView) -> UIAccessibilityCustomRotor {
    return UIAccessibilityCustomRotor(name: color) { searchPredicate in

        // Ensure we've got a square that's focused
        guard let currentFocusedSquare = searchPredicate.currentItem.targetElement as? UIView else {
            return nil
        }

        // Find the index of the square in the current stack view
        let indexOfCurrentSquare = stack.arrangedSubviews.firstIndex(of: currentFocusedSquare)
        let nextIndex: Int

        // Did the user swipe up, or down?
        switch searchPredicate.searchDirection {
        case .next:
            nextIndex = (indexOfCurrentSquare ?? 1) - 1
        case .previous:
            nextIndex = (indexOfCurrentSquare ?? -1) + 1
        @unknown default:
            fatalError()
        }

        // Ensure selecting the next square won't crash, this
        // Is basically signaling to VoiceOver we've either
        // Reached the end or the beginning of the elements
        guard 0..<stack.arrangedSubviews.count ~= nextIndex else {
            return nil
        }

        // VoiceOver will focus next based off of this result
        let result = UIAccessibilityCustomRotorItemResult(targetElement:
stack.arrangedSubviews[nextIndex],
                                                          targetRange: nil)
        return result
    }
}
Using this custom rotor function to create three rotors, the user could toggle to either “Red”, “Blue” or “Green” and the rotor would focus to that particular row with the next swipe up or down. Sequential swipes would then navigate through the squares in the row itself.
If we had implemented a single rotor instead of three (one for each row), we could have one single rotor called something like “Color Rows”, where each swipe up or down would take you to the next row and swipes left and right would navigate within them. It’s up to you to figure out which ways to implement these custom rotors - but try to create them in such a way that they navigate how users who aren’t visually impaired would scan and use your user interface.
When creating the implementation for a custom rotor, you’re essentially responsible for:
- Tracking the user’s search direction
- Returning the next item that belongs to the rotor based off of that
Another common way VoiceOver users rely on rotors is for long form text. Consider release notes for an app. If you or I were to implement a custom view, regardless of whether or not we used SwiftUI or UIKit, we might have one or more text controls listing everything out.
Visually, we’d likely make each release more distinct from the rest of the text. That means when folks view it, they are likely scanning the interface version by version.
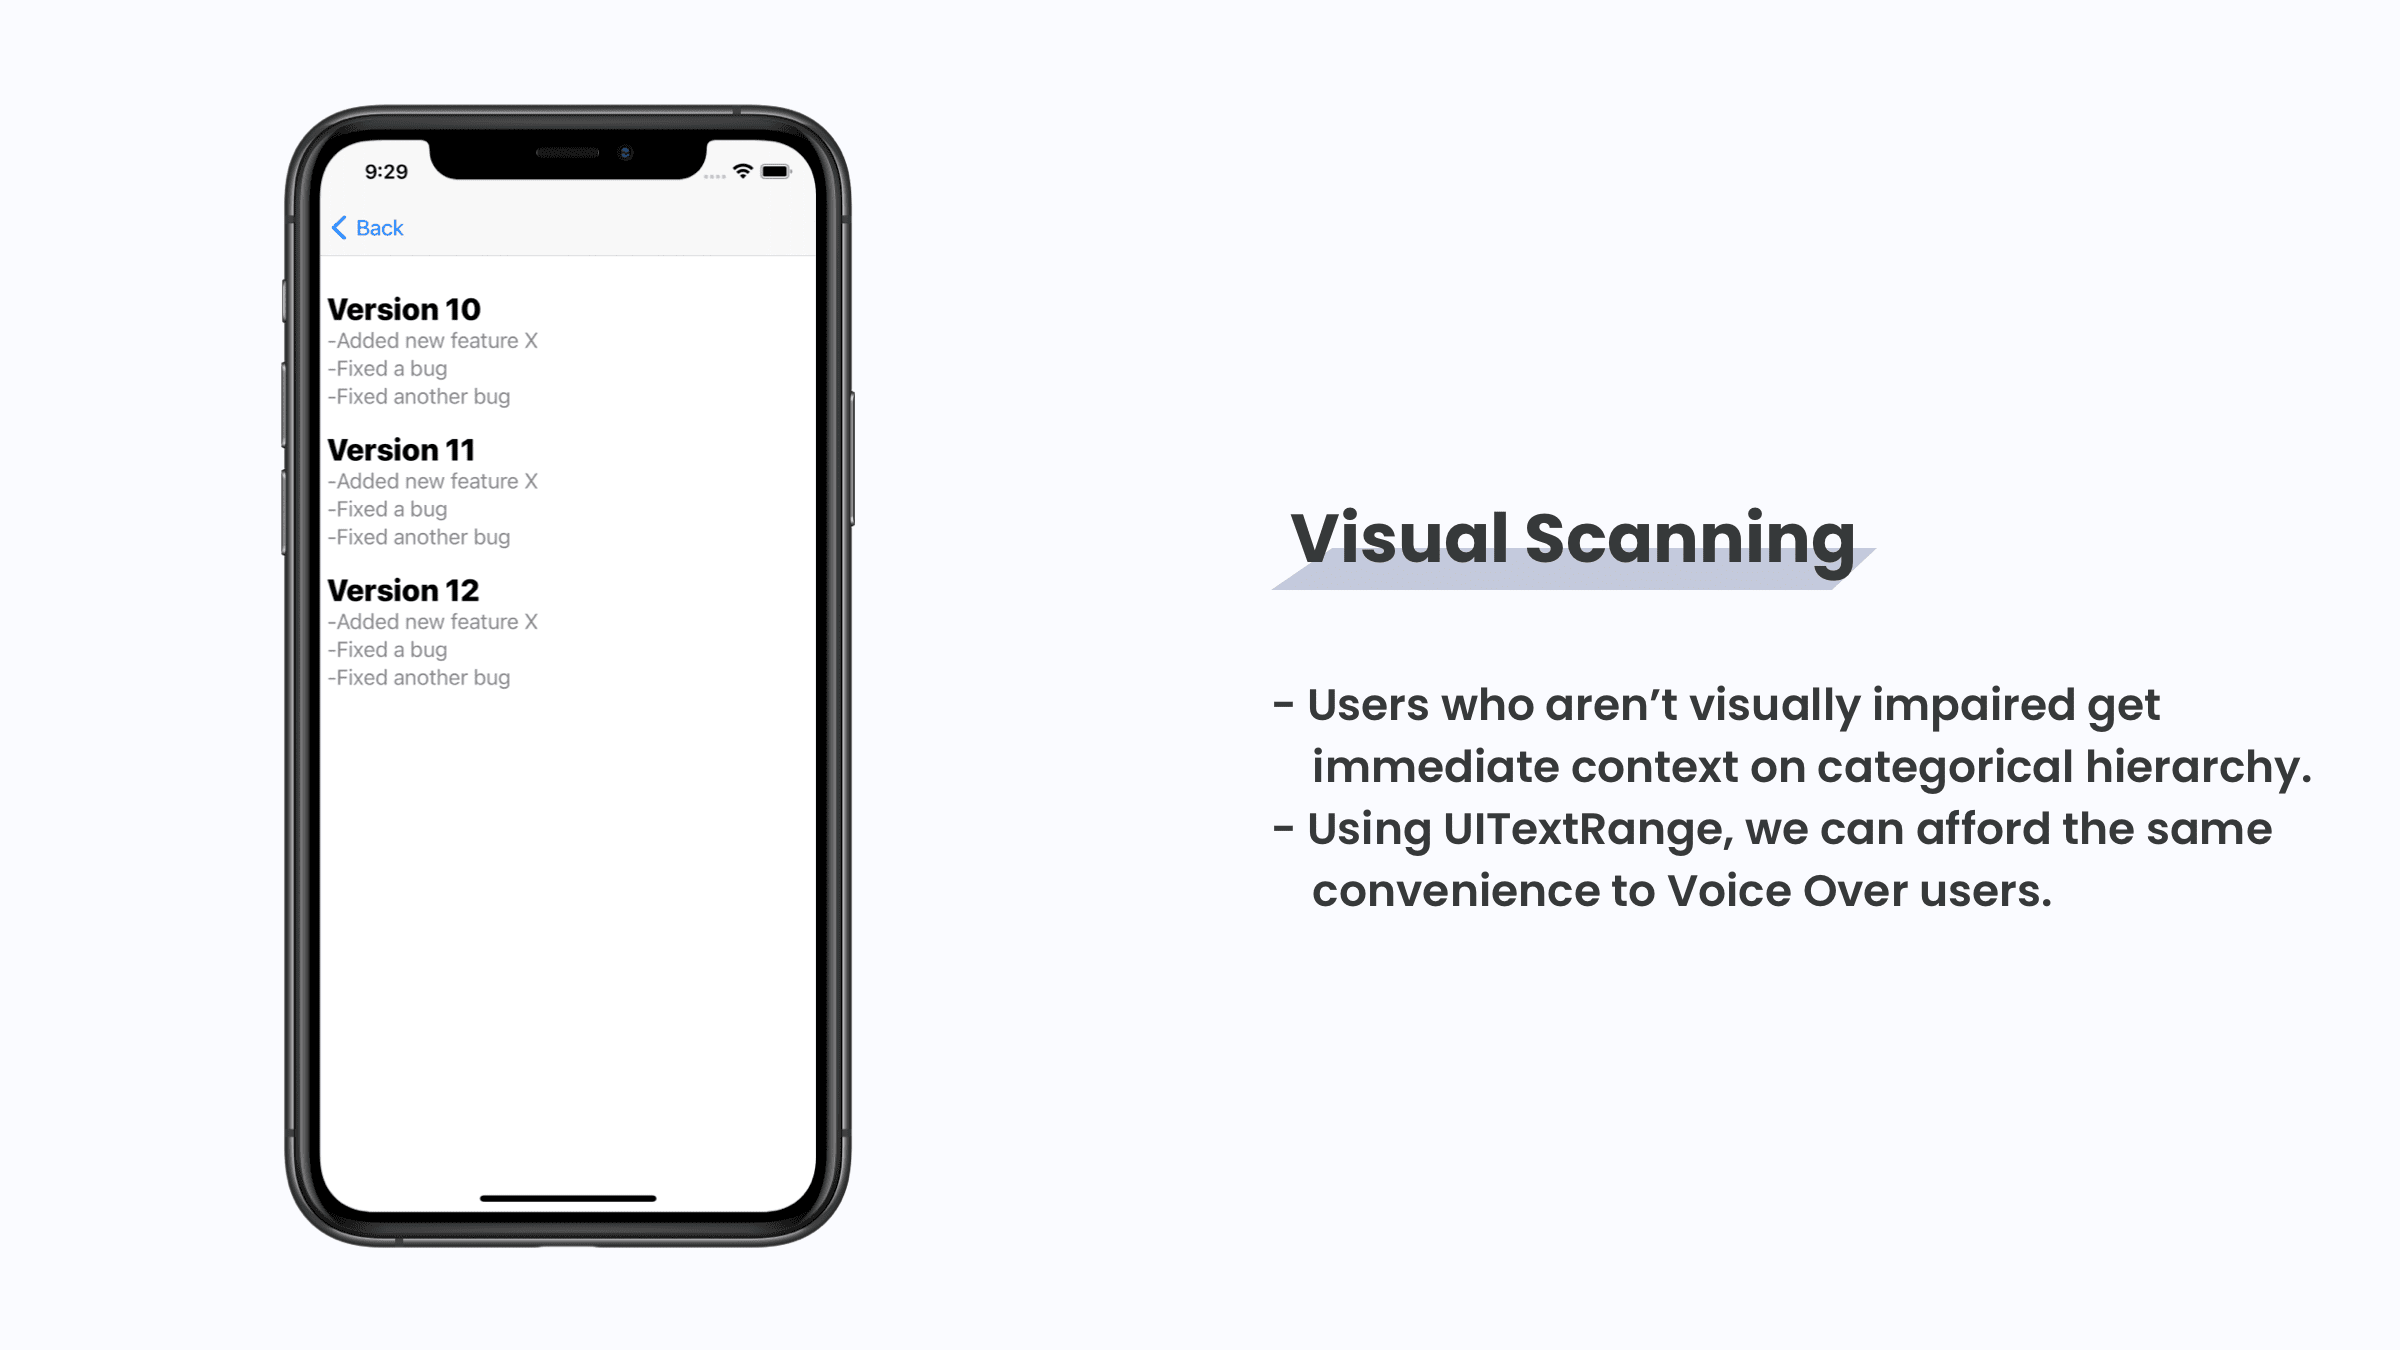
Since VoiceOver users don’t get that by default, one way to solve this would be with a custom rotor. Thankfully, the rotor control has a initializer specifically for text ranges:
// Xcode -> RotorControlFig2ViewController.swift
private func versionReleaseRotor() -> UIAccessibilityCustomRotor {
    return UIAccessibilityCustomRotor(name: "Releases") { [unowned self] searchPredicate in
        guard let currentTextView = searchPredicate.currentItem.targetElement as? UITextView else {
            return nil
        }

        var nextTextView: UITextView?
        let swipedNext = searchPredicate.searchDirection == .next

        if currentTextView == firstReleaseTextView {
            nextTextView = swipedNext ? secondReleaseTextView : nil
        } else if currentTextView == secondReleaseTextView {
            nextTextView = swipedNext ? thirdReleaseTextView : firstReleaseTextView
        } else {
            nextTextView = swipedNext ? nil : secondReleaseTextView
        }
        guard let textView =  nextTextView else { return nil }

        let versionTextRange = versionTextPosition(in: textView)
        return UIAccessibilityCustomRotorItemResult(targetElement: textView,
                                                    targetRange: versionTextRange)
    }
}
Notice that the logic and flow is extremely similar, but now we’re dealing with where in text the rotor should go along with the text control that contains it instead of in terms of a simple object(fn). This implementation requires a bit more tact that the one above, so if you can reconfigure your view setup to support the previous way of supporting a rotor control - by all means, do so.
However, I’d invite you not to be intimidated by this approach. Apple supplied it for a reason, and it’s built specifically for text-based navigation. It’s mostly a matter of translating a range of text into one UITextPostition object, so be sure to comb through the sample code to get a feel for it.
Tips
Know Where to Assign Rotors
When you assign to the accessibilityCustomRotors - make sure you do it as the right place. Any UIView can have these custom rotors, so when you assign some to any particular view, those are activated and used when that particular view is in focus.
If you need it makes sense to aggregate several rotors into one view’s rotor array, you certainly can:
self.view.acceessibilityCustomRotors = [view1.accessibilityCustomRotors, view2.accessibilityCustomRotors, view3.accessibilityCustomRotors].flatMap { $0 }
Using the Correct Traits and System Types
The rotor, in a sense, identifies where to go next categorically. For example, in most interfaces when the rotor is activated you’ll likely see “Heading” as an option. As I pointed out above in “How it Works”, that means you need heading level elements to have that accessibility trait so it’ll be exposed to the rotor control.
Conceptually, thinking in header level elements is quite trivial. But consider all of the other types of rotors available:
public enum SystemRotorType : Int {
    case none = 0
    case link = 1
    case visitedLink = 2
    case heading = 3
    case headingLevel1 = 4
    case headingLevel2 = 5
    case headingLevel3 = 6
    case headingLevel4 = 7
    case headingLevel5 = 8
    case headingLevel6 = 9
    case boldText = 10
    case italicText = 11
    case underlineText = 12
    case misspelledWord = 13
    case image = 14
    case textField = 15
    case table = 16
    case list = 17
    case landmark = 18
}
On the other hand, look at that list and try and see if there’s any elements you need to supply to the system that might would make sense to show but aren’t exposed as a rotor by default. Consider the interface below:
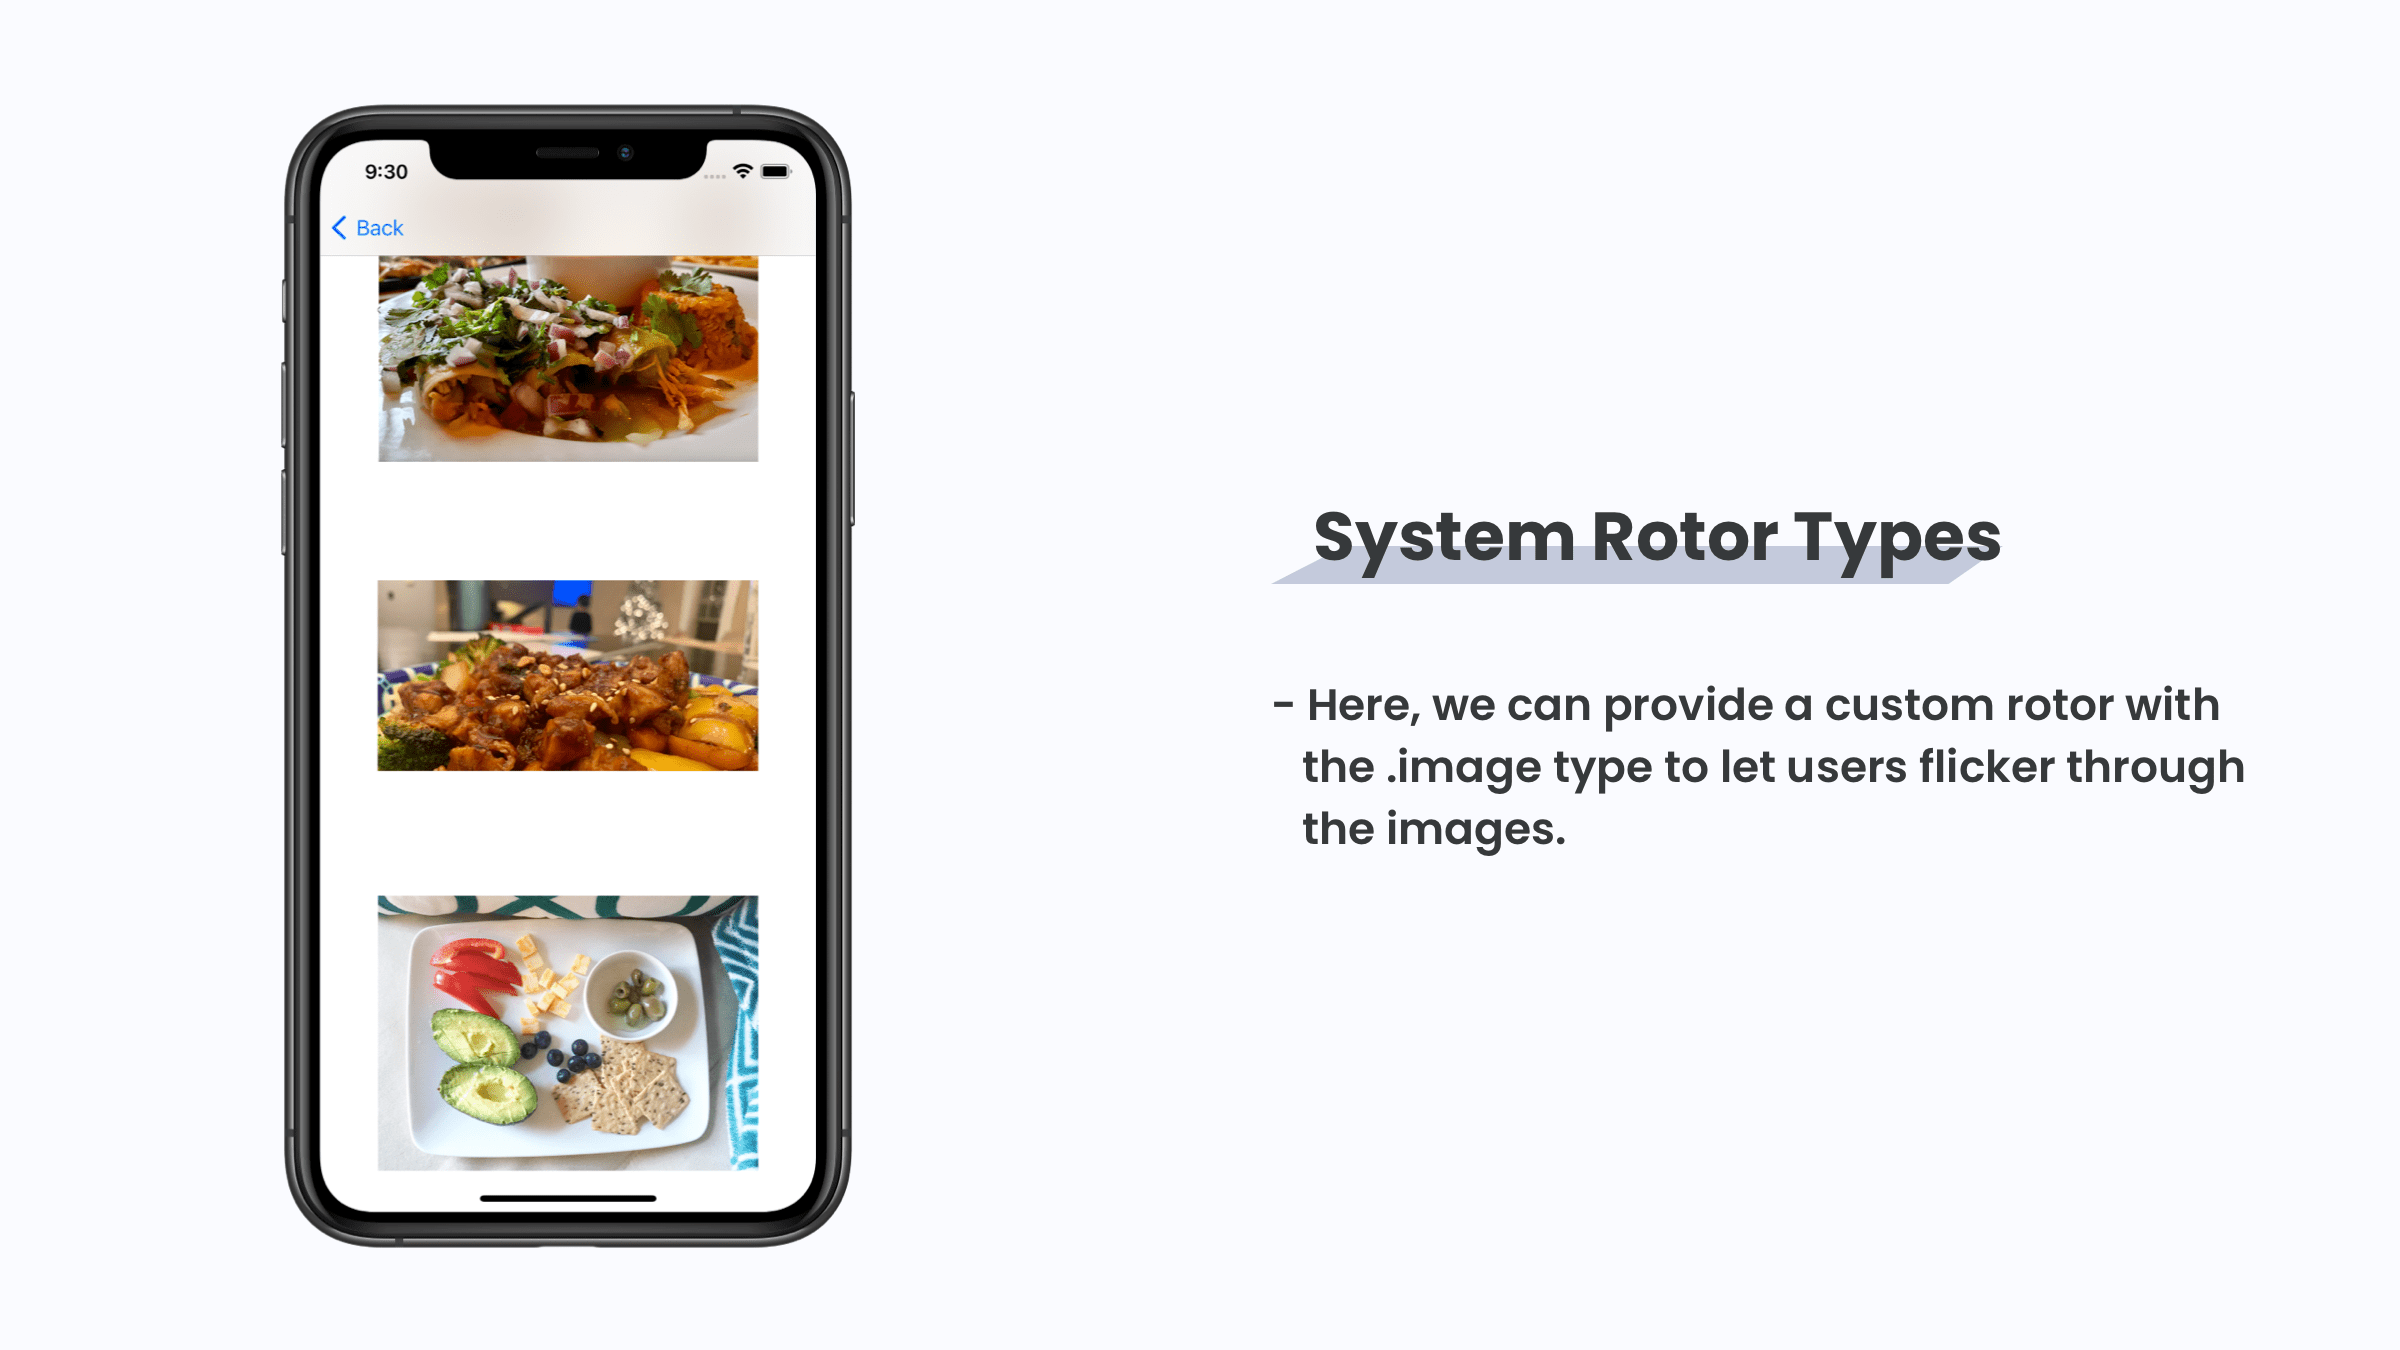
By default, there is no “Image” rotor that’s vended by the system, but using the initializer for custom rotor to take in a SystemRotorType, we can create one:
// Xcode -> RotorControlFig3ViewController.swift
private func imageRotor() -> UIAccessibilityCustomRotor {
    return UIAccessibilityCustomRotor(systemType: .image) { [unowned self] predicate in
        guard let currentImage = predicate.currentItem.targetElement as? UIImageView else { return nil }
        let nextIndex: Int
        let currentIndex = self.stackView.arrangedSubviews.firstIndex(of: currentImage)

        switch predicate.searchDirection {
        case .next:
            nextIndex = (currentIndex ?? 1) - 1
        case .previous:
            nextIndex = (currentIndex ?? -1) + 1
        @unknown default:
            fatalError()
        }

        guard 0..<self.stackView.arrangedSubviews.count ~= nextIndex else {
            return nil
        }

        return UIAccessibilityCustomRotorItemResult(targetElement: self.stackView.arrangedSubviews[nextIndex],
                                                    targetRange: nil)
    }
}
And now, activating the rotor control will show an “Images” option that will cycle through just the images within the interface. Notice that the initializer for the custom rotor takes in the SystemRotorType instead of a string, and we passed in .image.
Returning Results
Since we leverage UIAccessibilityCustomRotorItemResult to return the next item to select a rotor, it helps to know all of the ways you can package them up to the system. There are really only two simple responsibilities to remember:
- You’ll always return an item, or put differently - an object that the accessibility engine can select. If your logic dictates that you don’t have one, then you’d return nil from the rotor and not deliver a
UIAccessibilityCustomRotorItemResultinstance. Recall that the block you use to build a custom rotor asks you to return a nullable instance of that class - so indicating that you don’t have one is fine and in many cases the right call. It indicates to VoiceOver users that they’ve reached some sort of beginning or end. - Once you’ve got an object, you can also return a text range if you’re dealing with text. That’s really all VoiceOver needs from your custom rotor to navigate. On the other hand, you’ll also receive one of these objects from the search predicate (more on that directly below) when constructing custom rotors. This proves useful as you’ll be able to inspect the last focused item or text range to help you vend the next accessible item to that the rotor should navigate to.
Search Predicates
Leveraging the search predicate appears intimidating at first, but I’ve found it helps to rename it in your head to something like “Previous Rotor Item” since that’s what it often represents. Hearing the word predicate may have you draw comparisons to NSPredicate which isn’t accurate in this case. This is simply an object with some useful information to help you decide what to do next.
You’ll typically use two critical pieces of information from the predicate:
- The last item that was focused by looking at
predicate.currentItem.targetElement - The direction the user swiped to reason if they want the next or previous item:
switch predicate.searchDirection {
case .next:
 // User swiped for next item
case .previous:
 // User swiped for previous item
@unknown default:
 fatalError()
}
Custom Attributed String Keys
Since rotor results can be used in tandem with one or more text views you’ll be dealing with ranges of matched text quite often. Working with a text range is tricky enough, but you can make your life a bit easier in those situations by extending the attributed string API’s key type:
extension NSAttributedString.Key {
    static let versionHeader = NSAttributedString.Key.init("versionHeader")
}
Why do this? You can tack that key into your attributed text to later find its range in a trivial fashion when you’re creating custom rotors dealing with text:
// Note the Version header attribute added last
let attributes: [NSAttributedString.Key:Any] = [.font: UIFont.systemFont(ofSize: 24, weight: .heavy),
    .foregroundColor: UIColor.label,
    .versionHeader: NSNumber(booleanLiteral: true)]

attributedText.addAttributes(attributes, range:
                             rangeOfVersion(in: textview))

Then, when you’re looking for that text to translate into a `UITextRange` instance, you can look for the specific attribute without having to match raw text instead:
// Search the text view by our custom attribute
textView.attributedText.enumerateAttribute(.versionHeader, in: NSMakeRange(0,
textView.text.count), options: []) { valueAttribute, matchedRange, stop in
    guard valueAttribute != nil else { return }
    // Use matchedRange to get a UITextPosition from the text view
    // Then stop iterating
    stop.pointee = true
}
Avoiding Dead Rotors
If you find yourself making a custom rotor, assigning to an object’s custom rotor property and it doesn’t show up it’s likely because the item you’re returning isn’t an accessible item by default.
If this happens, be sure to check that the object has isAccessibilityItem set as true and that the accessibility traits it has lend itself to navigational purposes. For example, .staticText isn’t a navigational item so it wouldn’t do anything for a rotor. Always remember - the rotor is there to make navigation snappy. As such, it stands to reason that the items we vend to it help accomplish that goal.
Three Key Takeaways
- The Rotor Control helps VoiceOver users navigate their device efficiently.
- We can extend the system rotor controls and provide our own.
- Be sure to use the correct accessibility traits to ensure your existing interface works great with the system-provided rotors.
Final Thoughts
So there you go, I hope you dig it!
I don’t like to be all “sales-y” on here, but I figured this was the quickest way to get a snip of the book out there. If you’re not familiar with the book, it’ll cover five main topics which I believe make up a great app. Those are accessibility, design, user experience, iOS APIs and toolbelt expansion (the last being a bonus section for beta buyers). You also get private Discord access to ask me questions and hang with the community, an Xcode demo project, lifetime updates and a 20% discount.
If that sounds groovy, you can check things out at its website here. Thanks for coming to my infomercial!
Until next time ✌️